
Below are the outside panels to our digipak.

Below are the inside panels to our digipak.

Click on the image below to access our website.

Sunday, 5 November 2017
R+P Post 33: Reflections on my role and contribution during Research and Planning
In terms of planning our test shoot I feel like we all shared more or less equal responsibility and all contributed ideas to every aspect of the planning. The roles I think I was strongest in were storyboarding the video, creating potential designs for the digipak, working on the lighting in the studio and editing the rough cut of the video. I think the main aspects I need to work on in the real shoots are my performance skills as the DJ in the video, as this is something I have yet to master. There have been several steep learning curves, such as learning to use the camera in the studio and especially learning to use the lighting deck, but I believe that I am now confident in these areas, and I am ready for the main shoots!

R+P Post 32: Test shoot and rough edit
Our Test shoot went very well, as we followed our test shoot schedule:


One with lighting that we attempted to use to emulate a police car's flashing lights:

A two shot of the Dj and singer, which we also used to film the handheld shots of the DJ:


We focused mainly on four different setups, one using a projector:

One using a sofa with different lighting setups:


The test shoot was very useful to me, as it highlighted some practical problems we had yet to consider, such as how footage using projections would flicker. Because we realised this, we had to think about how to stage our shots using the projector to minimise the effect. It also gave us a chance to test out different lighting set-ups, and as a result we have several saved set-ups that will save us time in the real shoot.
The rough cut we produced using footage from the test shoot is below:
R+P Post 30 & 31: My shoot-board/ call sheet

This is our combined shoot-board and call sheet for our test week of filming. It has a tightly scheduled layout of when we are doing specific set-ups we had planned. It also contains a call-sheet of when each of us was available, as during the test shoot we used every possible opportunity to film. We didn't have any actors that weren't already in our group, so we didn't need to add any other names to the document. This shoot-board/call sheet was extremely useful for the test shoot, as it was kept us on schedule and allowed us to see who was available at what time, allowing us to plan when to shoot the shots requiring specific group members as actors easily.
R+P Post 29: Rehearsals
In order to make sure the test shoot ran smoothly and that we were cast in the correct roles, we held a test shoot for Aisha, who plays the lead singer of Cruze. This was immensely helpful in seeing whether Aisha would fir the role of the lead singer, and the result proved that she was very confident and enthusiastic in the role.
To get into my role as a DJ I watched various videos of professional DJ's to get a feel for what actions to do. I found this video especially helpful:
To get into my role as a DJ I watched various videos of professional DJ's to get a feel for what actions to do. I found this video especially helpful:
R+P Post 28: My kit list


 Our Kit varies depending on whether we are shooting in the studio or shooting on location. For our location shoot, the kit we use is shown here, consisting of:
-Canon Legaria HD camera
-Tripod
- Headphones
- Microphone that attaches to the camera
This kit works well on location, as the camera is small and lightweight, allowing us to take handheld footage, which we plan to do on our location shoot. The tripod is easily portable, and is useful in the studio and on location because it allows us to keep the camera still while we shoot.
 The microphone and headphones are useful particularly on location, as it will allow us to capture sound, which although will be absent in the finished video, will make it much easier to match our footage with the song.
R+P Post 27: Casting
The three most important parts in our production are played by the members of our group - Aisha is the singer in the studio shots and the main focus of the narrative aspect of our video, Sayo is a major character in the narrative, and I play the DJ of the group in the studio and location shots. We made ourselves the main characters because it is convenient, as we had already discussed what we wanted our artists to dress like and have experience using the various pieces of equipment needed in the studio. We have all also acted in the A2 prelim, which means we all know the dedication required for the shoot.
The other actors we have collated for our video are mainly to make up numbers in the location shots and to give the 'posse' effect of videos like 'Shutdown' by Skepta and 'You Know You Like It' by AlunaGeorge which have inspired us, as we hope this will make our singer look social and popular. These actors are friends of members of our group, so we will be comfortable working with them, and trust them to be committed. The full cast list is below:

The other actors we have collated for our video are mainly to make up numbers in the location shots and to give the 'posse' effect of videos like 'Shutdown' by Skepta and 'You Know You Like It' by AlunaGeorge which have inspired us, as we hope this will make our singer look social and popular. These actors are friends of members of our group, so we will be comfortable working with them, and trust them to be committed. The full cast list is below:

R+P Post 26: Set design, locations and props
The set design for our video is fairly simplistic, with the only major piece of set being a sofa to go in the centre of the frame for several shots. We think this will make the video seem casual, and will also look pleasant.
The props we are planning to use in the studio are mainly in relation to the DJ, specifically his 'DJ deck' (We are using a soundboard as a substitute.) and laptop, which we believe are vital in making sure the viewer knows straight away that this man on screen is a producer. We are also planning to use a stool in some shots for the singer to sit on, as this will also add to the laidback vibe of the video.

On location we don't have the soundboard, stool or sofa, and instead we have headphones for the DJ and a mobile phone for several shots in the narrative portion of the video.

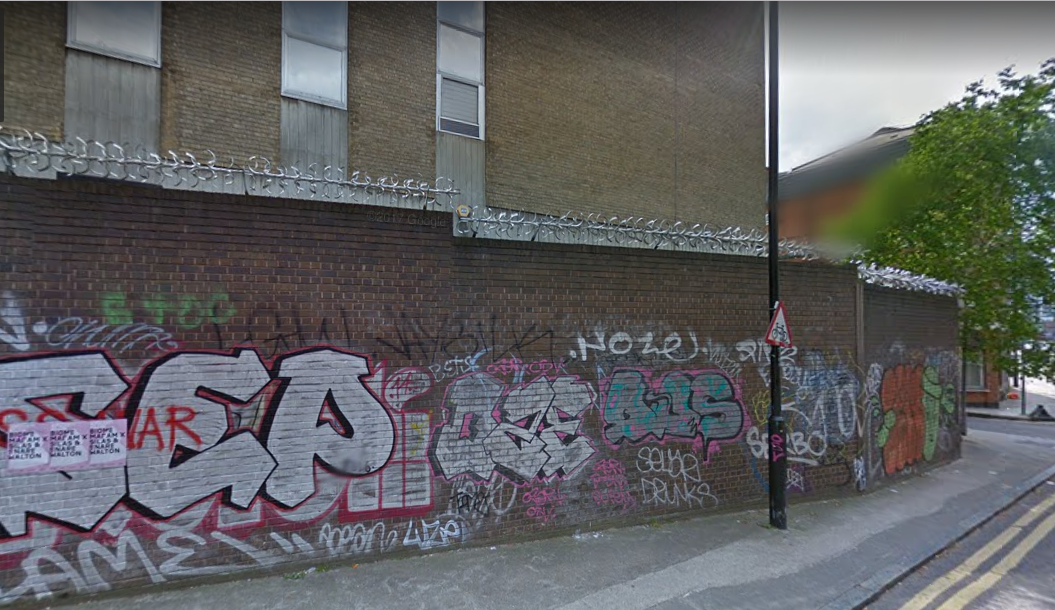
 The locations we are planning to shoot in are the graffiti covered side streets of Brick Lane and Wood Green, which we believe connote the urban sound of the music and the London-based location.
 |
| An example of one our storyboard post-it notes, which shows the sofa on set. |
The props we are planning to use in the studio are mainly in relation to the DJ, specifically his 'DJ deck' (We are using a soundboard as a substitute.) and laptop, which we believe are vital in making sure the viewer knows straight away that this man on screen is a producer. We are also planning to use a stool in some shots for the singer to sit on, as this will also add to the laidback vibe of the video.
On location we don't have the soundboard, stool or sofa, and instead we have headphones for the DJ and a mobile phone for several shots in the narrative portion of the video.

 The locations we are planning to shoot in are the graffiti covered side streets of Brick Lane and Wood Green, which we believe connote the urban sound of the music and the London-based location.
R+P Post 25: Costumes, props and make-up
Our costumes and make-up will hopefully connote the genres of UK R&B/garage and house music that our song falls into. We have attempted to make the costume for the singer and the extras on location based around casual, streetwise clothing that is popular primarily in the UK, with brands such as Adidas and Nike. The costume for the DJ is based off of what the most popular and influential DJs wear, and it is fairly similar to the rest of the costumes - it's usually streetwise and dark in colour. The only major addition is headphones, which seem to be omnipresent among DJs.


Our final costume is shown below:

- A table, soundboard and laptop for the DJ, as this will make him seem professional and also connote that he is a DJ to the audience straight away.
R+P Post 24: Planning my digipak panels
To plan our digipak panels we took our inspirations and I drew up some designs based on them.
 |
| This is the sheet showing all of our initial ideas for the cover of the digipak. We decided before we started that the design would focus on the lead singer of the duo. |
 |
| These designs were inspired by the covers of Adele's albums, which have tasteful black and white photographic portraits of Adele's face on their covers. However, we decided this didn't fit with our more electronic genre, so we discarded this idea. |
 |
| This is an idea we liked much more, as it shows the singer and the DJ, which signifies the genre much better. We also like the idea of the artists standing back to back, although we are thinking of having this position be photographed in a way where the singer is facing more towards the camera, with the reverse image on the back cover which would focus more on the DJ. |
 |
| This is a demonstration of this idea, although the image above is a design for the inside of the digipak. |
R+P Post 23: Planning my web pages
We designed our website pages using hand-drawn documents, and using the inspiration from several different existing websites.

We first asked our target audience what they usually looked for on websites for artists, and the main areas that came up were a merchandise shop, information about the artist and tour dates.
Based on this and websites we had looked at for other artists, we have planned our website to have 6 distinct sections, a home page, a page for the music of Cruze, a tab on the status of the duo's current tour, an about section giving information on the artists individually, a merchandise shop and a tab labelled 'More' that will contain news about the artists, as well as a picture gallery and information about Nimbus records. We also worked on finalising our ideas about what to put on the merchandise available in the web store, where we decided to mainly focus on putting the logo on various items of clothing and accessories.
 Our website was inspired by the websites of artists like Rihanna and Ariana Grande, which we thought were intuitively designed and easy to navigate. Ariana Grande's website is linked in the image below, click to access it:
R+P Post 22: Planning my promo shots
Our promo shots will be a mix between studio shots and location shots, and will be used on our digipak artwork and website. Our ideas are for shots that focus on the singer primarily, but also contain some focus on the DJ. We are planning for the location based shots to be spontaneous and casual, in order ot maintain a gritty, independent feel. We have planned out the studio shots in more detail.
 | ||
This image shows the final position we want the singer and DJ to stand in on the cover, and also shows some of the coloured backgrounds we are thinking of adding in during post-production.
 |

R+P Post 21: My key shots storyboard
Our storyboard was a vital tool in our planning process, as it was the first time that we were really able to visualise our project and compare each others visions of the video.
 |
| Our storyboard was created mainly to show the different set-ups we want to use in the studio and for the narrative shots on location. |
 |
| It was really helpful to make a storyboard, as it was the first time I had thought about the framing of my video, which is a vital element any music video. It also helps you to really get a feel how the video will look when it's finished. |
 |
| From our research we realised that most music videos use extreme framing that switches quickly between intense close-ups any long shots, contrary to the general rules of film. We tried to emulate this in our storyboard, as it makes a video much more exciting and attention-grabbing. |
 |
| This close-up shows a specific shot we have planned for the location shoot of the video, included here to give an idea of the individual detail of each post-it note. |
R+P Post 20: My Music Video Timeline
A very important element to our planning process was the music video timeline, which made us think about the structure and timing of our music video and about how the lyrics might affect the video.
 |
| The whole timeline. There are two main parts to the timeline, the lyrics in the bottom third and the timestamps/ specific shots in the rest. |
 |
| This |


Subscribe to:
Posts (Atom)