Here is our music video:


Below are the outside panels to our digipak.

Below are the outside panels to our digipak.

Below are the inside panels to our digipak.

Below are the inside panels to our digipak.

Click on the image below to access our website.

Monday 4 December 2017

Construction Post 6: Website post-production

I spent more time on the CRUZE website than on anything else during the post-production period, and I believe it has taught me the most skills. I used Wix.com to build the website and used Adobe Photoshop to create most of the images for the website.

Me editing the website.

I started off by creating background images for the main pages of our website, which was my first experience creating a complex image using photoshop, and although it took me a little while to get used to all of the tools, I eventually got the hang of it and managed to create the necessary images. The images used photos from our indoor photo session, and the layout and tabs of the website had been planned in the pre-production stages of our project. When I showed some members of our target audience these images they said they thought they fit well with the "vibe" of the band, and looked professional.

The main homepage image
The background image for the 'about' tab of our website
The background image for the 'contact' tab of our website.
The background image for the tour page.
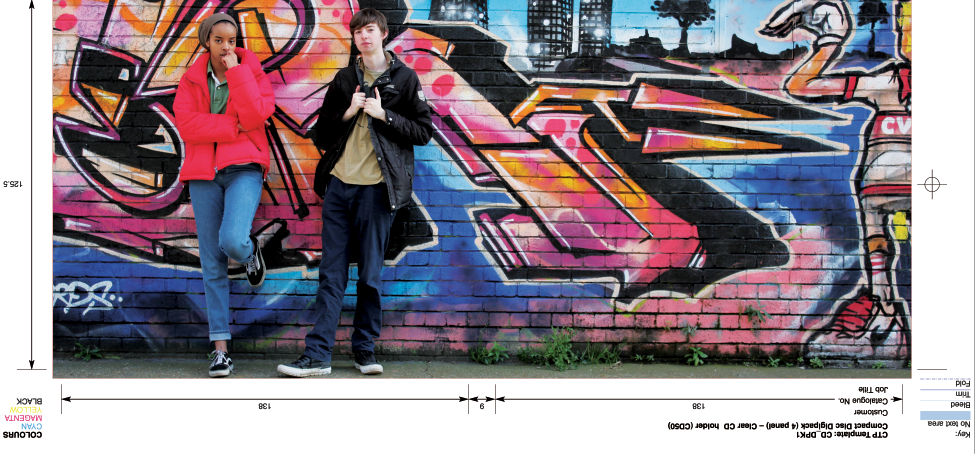
For the 'Music' tab of the website I used another photo form the Brick Lane photo shoot for the background, as I thought it was appropriate to present the music with an image that presented the grittier, more urban side of CRUZE, which audiences said they had enjoyed from our music video. 


Apart from creating these backgrounds, I also created all of the product images in the CRUZE shop, primarily by using print-your-own-design websites that allow users to preview their custom designs over a variety of products, such as T-shirts, hats and backpacks, items of merch which we had seen on nearly every music website we looked at.


I also created a Facebook page for CRUZE, and linked it to the website, which required me to maintain a somewhat active social media presence.


I also had to use audio editing program audacity to create blank audio tracks to fill up the space on the 'Crocodile Tears' album section on the 'Music' tab of the website, which I had never done before.

An example of audacity in use
I also had to get to grips with using the website builder Wix, which wasn't too bad, as the interface was very clear. I also tried to include opportunities for audience interaction, through a competition I created, as I believed this would make the website more interesting for the user.


I am very happy with the finished website, which you can see here:


Our target audience said that the website was very strong for the most part, with images and layout that looked professional. They said that they also liked the attempt to interact with the user through competitions, although some said they "wouldn't actually enter the competition, because you had to have a twitter account", so perhaps I could have included some opportunities for users of other social networks to enter a competition. 


Construction Post 5: Digipak post-production

Out of the three artefacts, the digipak was the one I had the least involvement with, but I still did a significant amount of work on it. The digipak was created using Adobe Photoshop. Before starting, we already had inspirations such as Craig David's cover to his debut album 'Fill me in', as well as using some planning sketches I had done in the pre-production stages of the task.


The sketch we used for planning.

From this inspiration we began by using pictures we had taken in our in-school photoshoot, cropping out the backgrounds are spot-healing to enhance the way the singer and DJ looked. We also found an appropriate background and modified it to look more pink, a colour scheme we had agreed upon beforehand.

The unedited image of Aisha as the singer of CRUZE.
The unedited image of me as the DJ in CRUZE.
The unedited background of the cover.
The audience response to the cover at this stage was generally positive, with people saying that they liked the background and the photos and thought it looked professional, but also saying that the costume worn in the photo on the front cover looked unpleasantly non-symmetrical, so we fixed this in Photoshop.

We got the fonts used on the cover from website 'Dafonts.com', which was interesting as I had never used an external font from a website before, although it was easy to implement. I ran into a small amount of difficulty when trying to get the song titles to show up clearly, eventually realising that I had to cut a track from the tracklist in order to make it fit with in the light colour of the cloud, which made the titles easy to read.

The final stages included working on the cropping of the image of me on the back cover and adding on the 'Nimbus Records' logo (Which I also created), adding the bar code and adding the legal information required on the back cover. The cover is also based off of some designs we had planned beforehand.
The final outside cover for the digipak.
I also chose, cropped and edited the inside cover image. We had planned for the inside cover to be a single image, and we chose an image from our photo shoot from our fourth week of post-production where we re-visited Brick Lane to get some shots for this purpose.

The final inside cover of the digipak.
The audience response to the final was quite positive,the inside cover especially being praised for it's urban look and that it had good synergy with the music video, but also saying that the front cover looked a bit flat as criticism.

Construction Post 4: Music video post-production

Our music video was edited using Adobe Premiere Pro.

In the first stage of editing I had to go through all of the footage and name it appropriately, which took a significant amount of time in itself due to the large quantity of shots that we had.filmed. Once this was finished I began to put the shots down, trying to stick to the conventions we had found when we looked at videos in the same genre. this included cutting at varying speeds depending on the tempo of the music. I also tried to give the video a sense of progression through both the narrative presented in the video and also through only specific setups for different sections of the song, such as mainly using the 'police siren' shots for the "Don't want to feel you, don't want you on my mind" refrain of my song, and only introducing the projector shots during the second verse. I also utilised some editing techniques that I had learnt from editing my preliminary music video remake, such as editing footage to give a realistic lip-sync with the music.
The default screen of Adobe Premiere Pro

 I then got some feedback on the video from our target audience, who said that they generally liked it, but that the colour difference between the studio shots and the location shots was a bit jarring and that some of the narrative shots were a bit confusing.

After finishing the basic edit and carrying out some improvements, I started focusing on grading the video, which I hoped would fix some of these complaints mainly consisted of lowering the brightness and increasing the contrast of the already colourful studio shots to give them a deeper, more eye-catching appearance. and increasing the saturation of the location shots to make them less jarring when edited next to the much brighter studio shots. This final edit was praised by our target audience, with comments praising how professional the video looked, with one person saying "It's like a real video!". People also praised the way that the video developed as it went on with new setups constantly being introduced, which "Kept the video interesting." Despite this, some people had some criticism, mainly to do with the narrative, which some said was "A bit confusing" and that "The acting wasn't great.", but I do believe that the narrative is a net gain for the video, as it gives some context to the video and visualises the story in the song's lyrics.

An example of a non-graded shot on the left and a graded shot from the same take on the right. The dark parts of the shot are much darker in the graded version, and the colours stand out more as a result.

Construction Post 3: Week 3 production

Week 3 was our mainly occupied with shooting our studio shots, which took until Wednesday. We had 4 main setups, and within these we produced doezns of different shots by changing the colours we used, the camera angles and through varying the types of performances given.

1. A setup that used a DJ deck and a stool, which functioned as the main studio performance shot.


2.A setup with a projector, where we projected various videos of kaleidescopes and optical illusions onto the back of the studio. inpired by the video for 'We Found Love' by Rihanna.


3. A setup with alternating blue and red 'police siren' lighting inspired by the Kali Uchis video for 'Tyrant'.

4. A setup with a sofa inspired by the video for 'Stay The Night' by Zedd.


This week went very well for the most part, and we got a nice variety of shots. I also got to try out a variety of roles, such as as an actor and a cameraman. I also got a lot of experience using the studio's lighting desk, which I had never previously used before, other than in the test shoot. I believe that I became very competent at using this piece of equipment over the three days of the shoot.

We ran into only several small problems, mainly to do with shots being framed at slightly wonky or uneven angles and to do with the shadow of the camera operator being prevalent in certain handheld shots, which we re-shot in order to fix. We also had an issue with some of our group shots using external actors, as some of them seemed nervous or uncomfortable on camera. We fixed this by getting in some actors that we knew were more experienced with the media shooting process on our final day of shooting to fix this issue.  

Our target audience responded very positively to most of our studio shots, with the distinctive colours and realistic performances being praised.

Brick Lane photo shoot

After our main studio shoot we travelled to Brick Lane again to take some photos for the inside cover of our digipak. This was a quick but efficient shoot, as we were re-visiting locations we had used in our music video shoot. I acted and transported the tripod to and from the shoot.


Construction Post 2: Week 2 production

In our second week of production we had another location shoot in Wood Green, and planned our studio time, which was booked for the third week of production.

Wood Green Location Shoot
A picture of the car park in the daytime.

On Thursday 16th November we left school at 3:45 as a group with our actors and took the bus to Wood Green, where we walked to the top level of a car park, by which time it was night. Here we took several group shots and a handheld solo shot of our singer before our battery power ran out and we had to leave. Although I would have liked to shoot some more solo shots, the material we did get was very atmospheric and fits in with the aesthetic we want for our video.

Similarly to in Brick Lane, I did work as an actor, as a camera operator and as a clapperboard operator, and I also suggested some parts of the car park to use in our shoot. We also encountered some issues, such as when two men started watching us film, which put off the actors in our video, but they quickly went away when we stopped filming. We also had to ensure that we were very careful when shooting on the ledge as there was a large drop below it, but we managed to do this successfully.

An example of some of the shots taken at Wood Green
The audience feedback was a bit more mixed on this shoot, with many suggesting that we should have got more footage, because they thought the car park was "a cool location" and we could have got more shots within it.
Planning our studio shoot

For the rest of the week, we planned for our studio shoot scheduled for the following week. In order to do this we created a shootboard, an example of which is below.

Our shootboard for monday. All of our shootboards looked similar to this.

In-School photo shoot

Throughout the week we had two in school photo shoots to get images for our digipak and website, which went very well. We had planned the shots we wanted for the digipak beforehand, so we were able to quickly get these photos, but since we hadn't planned any specific setups for our websites we took turns posing and using the camera in different costumes and positions. Overall this was a quick and trouble-free experience and I believe we have got more than enough shots for our website. Some examples of photos are below:


Construction Post 1: Week 1 production

For the first week of production we had our first location shoot at Brick Lane and planned our second shoot in Wood Green.

Brick Lane Shoot 

This shoot took place on Sunday 5th around a specific corner of Brick Lane covered in graffiti. All of the shots we planned to shoot are visible on the shoot-board to the left, which we followed closely to get all of the shots we needed. We utilised some of the most colourful walls to get a variety of solo and group shots that embody the gritty, urban feel we were going for. We also filmed several narrative shots that will help give our video a sense of progression. We faced several problems, such as having to try and avoid traffic while filming, but this was solved naturally as the time moved beyond lunchtime as the alley we were using became less busy. We also had several revisions, such as choosing not to film a planned shot of Aisha stepping on a sweet wrapper, as we decided it was too cheesy and against the image of the duo, but apart from this there were no major changes to what we had planned.

Overall, it was a successful shoot, as the actors all turned up on time and helped us to achieve what we had planned.

Some examples of our group during the shoot.
My personal contribution to this shoot was quite large, as I helped to transport the tripod to and from the shoot, acted in many of the shots, operated the camera on several narrative shots and also did the clapperboard.

The audience feedback we received when we showed the raw footage to some members of our target audience was generally positive, with them praising the urban location and Aisha's performance as the singer, but also commenting that the external group members looked slightly uncomfortable in some shots.

 Planning the Wood Green shoot

We also planned our Wood Green shoot, which we had scheduled for Thursday 16th November. We had to contact a different set of actors, as we plan to have many different people in our location shots, and we did this across Monday-Tuesday. The location we plan to use is the top level of a car park at night in Wood Green, so we also had to think about safety precautions, such as seeing if many cars would be coming in and out of the car park and about the precautions the car park had.


Sunday 5 November 2017

R+P Post 33: Reflections on my role and contribution during Research and Planning

In terms of planning our test shoot I feel like we all shared more or less equal responsibility and all contributed ideas to every aspect of the planning. The roles I think I was strongest in were storyboarding the video, creating potential designs for the digipak, working on the lighting in the studio and editing the rough cut of the video. I think the main aspects I need to work on in the real shoots are my performance skills as the DJ in the video, as this is something I have yet to master. There have been several steep learning curves, such as learning to use the camera in the studio and especially learning to use the lighting deck, but I believe that I am now confident in these areas, and I am ready for the main shoots!


R+P Post 32: Test shoot and rough edit

Our Test shoot went very well, as we followed our test shoot schedule:
We focused mainly on four different setups, one using a projector:

One using a sofa with different lighting setups:


One with lighting that we attempted to use to emulate a police car's flashing lights:

A two shot of the Dj and singer, which we also used to film the handheld shots of the DJ:


The test shoot was very useful to me, as it highlighted some practical problems we had yet to consider, such as how footage using projections would flicker. Because we realised this, we had to think about how to stage our shots using the projector to minimise the effect. It also gave us a chance to test out different lighting set-ups, and as a result we have several saved set-ups that will save us time in the real shoot.

The rough cut we produced using footage from the test shoot is below: